Sunday, October 9, 2011

Easy Herb Foccacia Bread

I know that many of you may be intimidated by the thought of making your own bread at home. Let me tell it to you straight - it's one of the easiest things EVER. This recipe is very foolproof and simple. It just takes time (you need to let the dough rise and ferment overnight, for 8-14 hours). But the actual amount of work on your part is extremely minimal.


I found the original recipe for this foccacia on one of my favorite blogs, Budget Bytes, and adapted it a little bit according to my own taste.  If you've never visited Budget Bytes, you should definitely make a point to check it out. Beth has posted hundreds of affordable and easy recipes, and I haven't tried one yet that hasn't been absolutely great! 

The ingredients you will need:
  • 1.5 cups whole wheat flour
  • 2.5 cups all-purpose flour 
  • 1.5 tsp salt
  • 2.25 cups lukewarm water 
  • 1/2 tsp active dry yeast (you can buy three small connected packets for around $1 at the store in the baking aisle, each little packet contains about 2.25 tsp of yeast)
  • 2 Tbsp olive oil
  • 1 Tbsp fresh or dried herbs of your choice - I used herbes de province (which is a herb blend of rosemary, thyme, marjoram, lavendar, etc) and fresh rosemary from my herb garden. Italian seasoning blend would also work great (a blend of basil, oregano, sage, savory and rosemary). 

Note: You'll also need a small baking sheet, enough foil to cover the baking sheet, and non-stick cooking spray. It's best to start this recipe in the evening or at night, so you can finish and bake it the next morning or afternoon and let all the rising happen while you're snoozing!


Step 1: Mix together your two kinds of flour, salt, and yeast. 

I really like a ratio of 1.5 cups whole wheat flour to 2.5 cups white flour, but you can use all white flour if you prefer. I wouldn't recommend using all whole wheat - it will be much too dense and won't rise well.

You can also add some seasoning at this step (I added a sprinkle of dried garlic and onion with my dry ingredients, but that's completely optional and I forgot to picture them in the ingredients). 


Step 2: Add your water to the dry ingredients. Add the 2 cups first and mix to see where you're at. The dough should all come together into one ball without dry bits. 


 This is where I was at after adding the first 2 cups of water and mixing:


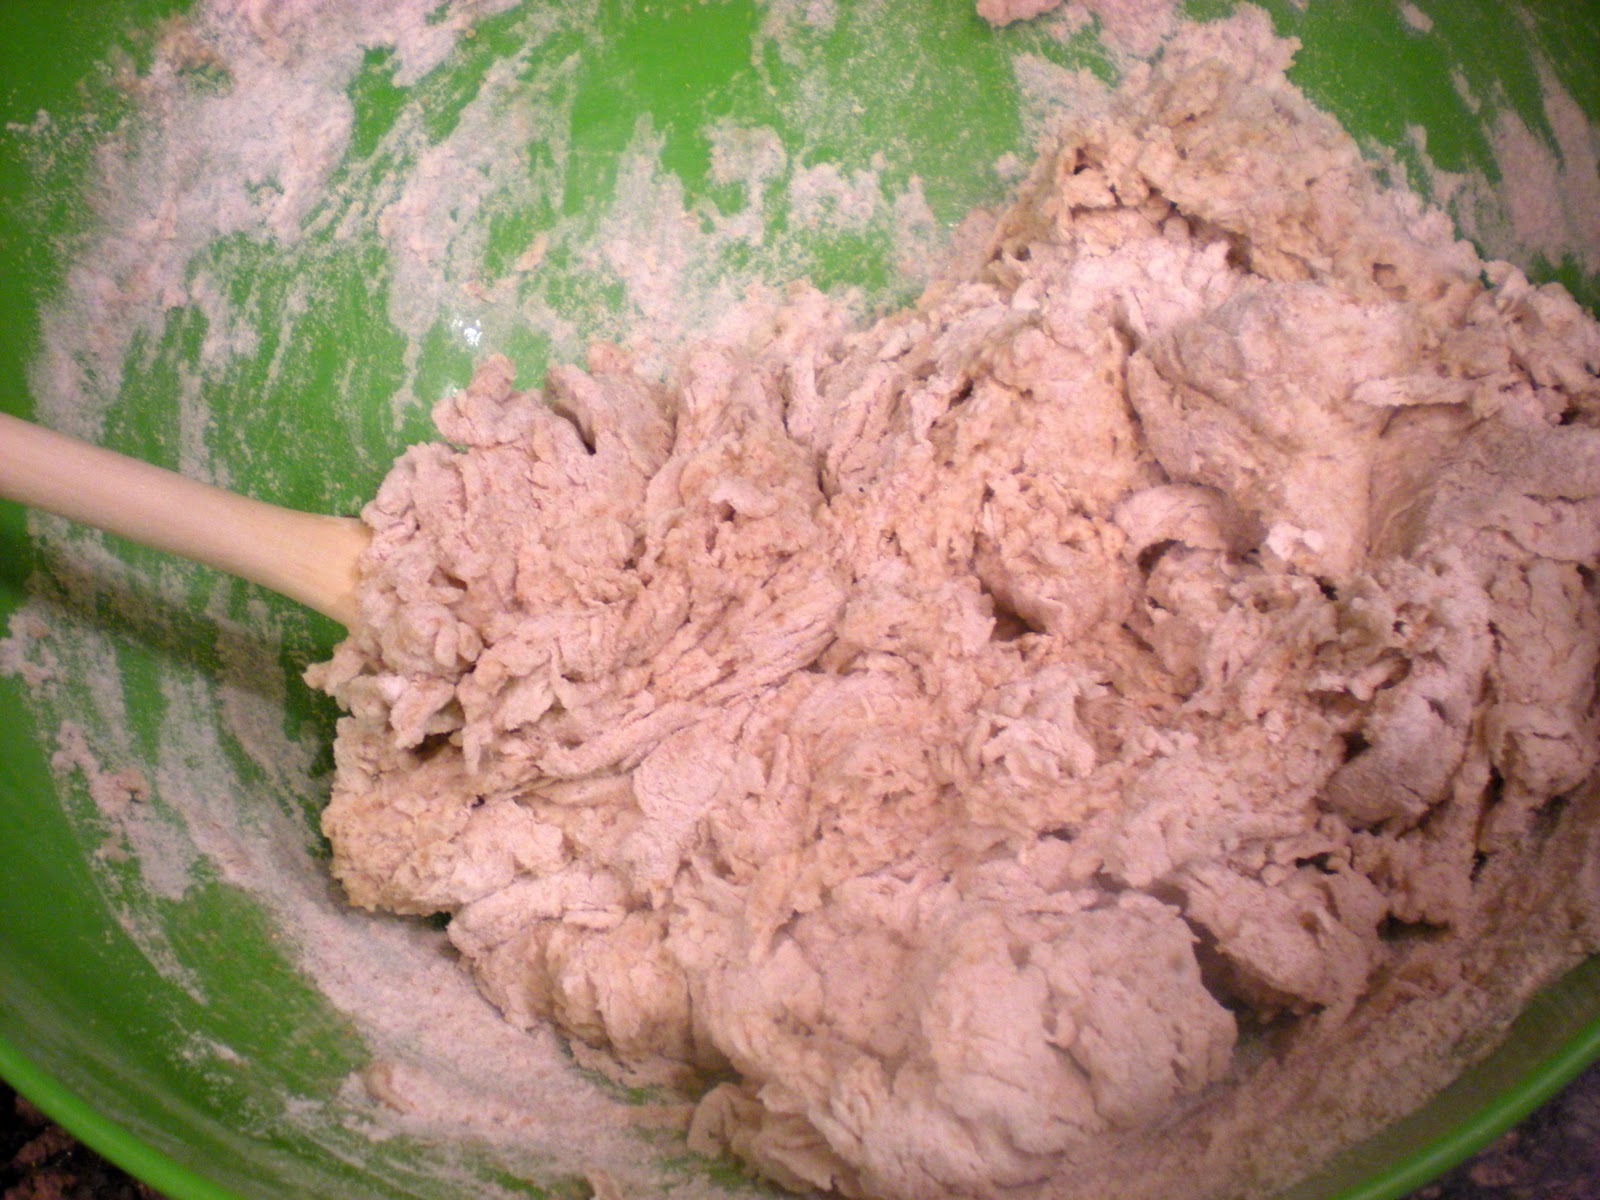
If there are still dry pieces, add the other 1/4 cup a little at a time (I ended up having to use it all, it kind of depends on how dry your flour is and what ratio white-whole wheat you use). Remember, it's better for your dough to be a little too moist than too dry. You want one cohesive, sticky ball of dough. It will look a little lumpy and weird. 


Step 4: Loosely cover the bowl with your dough (I just use a kitchen towel, but you could also use foil or saran wrap). This helps the dough retain the warmth it needs for the yeast to grow and make it rise. Let it do its thing for 8 - 14 hours. I let mine sit for 12 exactly (7pm to 7am the next morning).


Step 5:  8-14 hours later, check out your dough - it should have doubled in size, and if you listen to it, you can hear it bubbling! Funky, I know. Preheat your oven to 425. 


Step 6: Line a small baking sheet with aluminum foil and spray generously with nonstick cooking spray. 


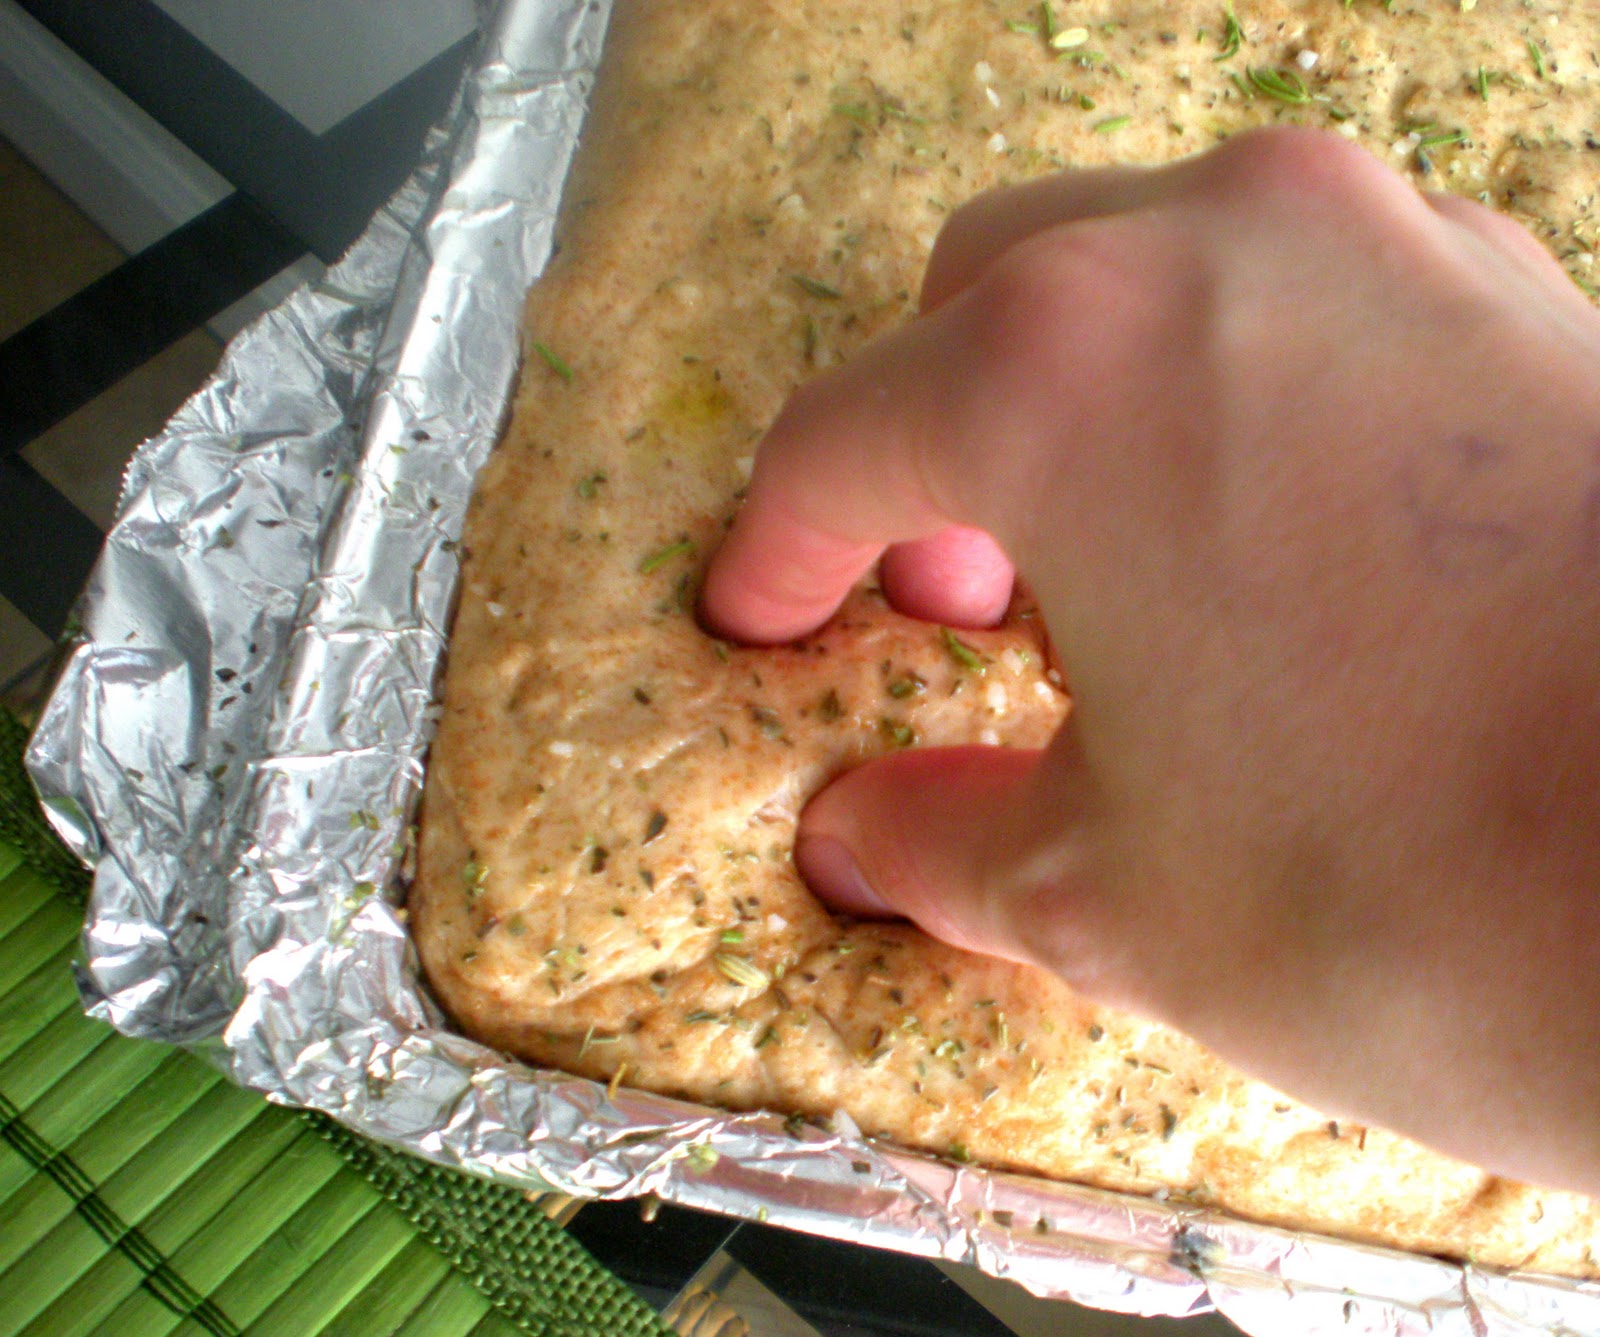
Step 7: Plop your dough ball onto the baking sheet, and use your fingers to stretch and pinch it to the edges. If you are using a large baking sheet instead of a small one, don't try to stretch it all the way to the corners (it will be way too thin). Just form it into a rectangle. It should look like this:


Step 8: Drizzle the olive oil over your foccacia and use your fingers to spread it around evenly. Allow it to rise 1 more hour on the baking sheet. 

Step 9: After the second rise, it will be puffy and probably extend past the top of the baking sheet if you look at it from the side. That's perfect! Add a generous sprinkle of whatever herbs you'd like at this time. I also added a sprinkle of some coarse kosher salt to add crunch and flavor. 

This is what it looks like after the second rise and adding the herbs: 

Notice how much more puffy it is than in the previous picture? Now it's time to add some texture to your dough to give it the classic foccacia look. 

Step 10: Using your fingers, gently press down into the risen dough to give it dimples. 

 
 This is what it should look like when you're done: 


Yummy...look at all those herbs and salt nestled in the dough! Now it's ready to bake! 


Step 11: Bake at 425 for 20-25 minutes, or until the top is a nice golden brown. Your house will smell AMAZING when this is in the oven. 

This is what it looks like when it's all done: 


Wait until it's cooled most of the way before you try to peel it off the foil and slice it. Otherwise you might burn yourself or squash your bread. Look how good it looks.


 Slice it into rectangles and split them in half to use for sandwiches (to die for - hearty, crunchy, and so flavorful compared to plain old sandwich bread), or slice it thin into breadsticks and serve with soup or dip in marinara sauce! 


 I loved dunking them in my zuppa toscana ...mmmm. You can't ask for a much heartier meal than that!


Store your foccacia in a large ziplock bag in the pantry if you plan to eat it within 2 or 3 days. Homemade bread and baked goods don't contain all the weird preservatives that storebought do, so it won't last nearly as long as a loaf of bread you'd buy from the store without going moldy or drying out.

If you are like me and live alone or with one other person, I recommend freezing half your batch- it freezes great. Then you can pull out a slice of homemade bread whenever the mood strikes, microwave it for a few seconds, and you're good to go!

I hope you enjoyed learning how to make your own foccacia bread from scratch! Let me know if you give it a try. 

Thanks for reading!
xoxo

JEN 

Sausage, Kale, and Potato Soup (Zuppa Toscana)

This Tuscan-style Italian soup recipe was inspired by the Zuppa Toscana soup at Olive Garden. Now, I'm not normally a big fan of Olive Garden, but the one thing I love there is this soup. Now I can make it at home! Score. 


This soup features sliced potatoes, kale, and mild italian sausage in a creamy chicken broth. It's easy and delicious. Here's what you'll need: 

  • 6  14oz cans of chicken broth
  • 1 lb. italian sausage (I used mild, but you can use sweet or hot if you'd prefer!)
  • 1 bunch of kale 
  • 5 medium red potatoes 
  • 1 white onion
  • 5 cloves of garlic
  • 1.25 cups half and half (you could also substitute milk or heavy cream)
  • 1/2 - 1 tsp red pepper flakes, depending on how spicy you like things
  • 1/2 tsp paprika
  • salt and pepper to taste. 


Step 1: Set a large pot of salted water to boil over high heat. It helps if you wait until the water from the tap is really hot before adding it to your pot - it will come to a boil much faster that way.


Slice your potatoes into very thin discs.


 When you've sliced them all, add them to the boiling water. 


Step 2: In a large heavy-bottomed pot or dutch oven, brown your sausage over medium heat. Add 1/2 - 1 tsp of red pepper flakes and 1/2 tsp paprika to the sausage while it browns. I would err on the side of caution with the red pepper - you can always add more later on if you'd like more kick, but you can't take it out once it's in there. The paprika doesn't really add spice, just flavor.


Step 3: While the sausage and potatoes are cooking, you should dice your onion and mince your garlic (or squeeze it through a garlic press). Here's the best way to dice an onion:  Slice it in half from root to tip and chop off the ends. 


 Place it cut-side down on a cutting board and slice it into thin half-moons, keeping it all together. 


Once you have the whole thing sliced one way, rotate your knife 90 degrees and start chopping it in the opposite direction to yield small pieces. It's easy!


Step 4: Remove the fully cooked sausage with a slotted spoon to a paper-towel lined plate (to absorb excess grease - I forgot to do this, but I'd recommend it) and set aside. If there's a bunch of grease left in the pot, use a paper towel to wipe some up or dump it out in the sink. You don't want oodles of grease in your soup.


Step 5: Add your diced onion and minced garlic to the same pot the sausage cooked in. Let it cook for about 2 minutes, or until it's starting to get translucent. Keep an eye on it - garlic can burn quickly.


Step 6: While the garlic and onions are cooking, quickly drain your potatoes in a colander and give them a quick rinse. You may notice the water the potatoes cooked in is all foamy on top - that's all the starch we are avoiding getting into the soup by cooking them on their own.


Step 7: Add your 6 cans of broth and the cooked potatoes to your dutch oven with the onions and garlic. Give it a good stir to loosen all the onions and garlic on the bottom of the pot. 


Step 8: Rinse and chop your kale into small chunks. They don't have to be perfect tiny pieces - you could even just tear it up with your hands if you wanted. The goal is to get it down to bite size. 


Step 9: Add your half and half to the broth and stir it together. Add your cooked sausage and kale to the pot. Allow it to simmer for at least 5 minutes before serving to allow the kale to wilt and cook a bit. 


This recipe makes a lot - share it with your friends or family! I like to serve it with herb foccacia bread (stay tuned for the recipe) for dunking. 


Yum! I will certainly be making this recipe all winter long. Now, if the weather would just cool down a bit....


Thanks for reading! Feel free to ask any questions in the comments section.
xoxo


JEN

    Sunday, October 2, 2011

    How to Win Friends and Influence People: Make this Artichoke-Crusted Chicken

    This is one of my all-time favorite recipes, and I'm sharing it with you! I originally stumbled upon this at a blog called rainy day gal, but the original credit goes to SugarLaws. Thanks to both ladies for sharing this incredible recipe. I know I'll be making it time and again - why don't you give it a shot?


    As the title of the post suggests, this dish is insanely delicious (yet also extremely simple and easy to put together). Make it for date night, to impress your parents, to make your roommate forget about all the dirty dishes you left in the sink last week, or just all for yourself because you're that special! 

    Here's what you'll need (Serves 4)
    • 2 large boneless, skinless chicken breasts (about 1.25 lbs)
    • 6 0z marinated artichoke hearts (small jar), drained and chopped
    • 3 Tbsp mayonnaise 
    • 1/8 cup mozzarella cheese 
    • 1 Tbsp olive oil
    • Salt 
    • Fresh cracked black pepper
    • Red pepper flakes   
     

    Step 1: Rinse your chicken and pat dry with a paper towel. Set on a cutting board and cover with a piece of cling wrap. Using a meat mallet (or another heavy flat-bottomed object), pound the living daylights out of your chicken breasts until they are flattened. 


    Here's what they look like when you're done smashing them. The reason for this is to allow them to cook faster and have more surface area for the artichoke mixture to cling to. 
     

    Step 2: Trim off any fat and nasty bits. Slice your breasts in half on the diagonal (yielding 4 equal size pieces). I am counting each 1/2 breast piece as a serving, but if you have a very hearty appetite this recipe will only yield 2 servings.
     

    Step 3: Season well on both sides with salt and freshly ground pepper. Sprinkle on a few pinches of red pepper flakes (a little goes a long way - it's SPICY!)


    Step 4: Drizzle your Tbsp of olive oil into a large nonstick skillet over medium heat. Allow it to warm up a bit (the oil will get very thin and runny - that's how you know it's hot enough). Preheat your oven to 425.


    Step 5: Add your chicken breast halves to the skillet and brown them. My skillet wasn't huge so I only added two halves at a time to avoid crowding the pan. When you add too much food with moisture in it to a cooking surface that's not big enough to accommodate it (overcrowding), the food will end up steaming in it's own juices that are evaporating, instead of browning in the oil. You want it to achieve a nice golden brown crust. 


    When the first side gets nice and golden brown, it's time to flip! 


    Keep an eye on your chicken, adding more pieces when the first two are almost done. They don't need to be cooked ALL the way through, because they are going in the oven later. Baking in the oven will complete the cooking process - if you cook them all the way through in the skillet, they will get dry and overdone after being in the oven too.


    Step 7: While your chicken is cooking on the stove, mix together your artichoke topping. In a small bowl mix 6 oz drained and chopped marinated artichokes, 3 Tbsp mayonnaise, and 1/8 cup mozzarella cheese. You could actually use any white cheese you want, but mozzarella is what I had on hand. White cheddar, parmesan, or romano would also be fantastic! 

    Step 8: Try to refrain from eating a bite right off the spoon. I couldn't ;) 


     Step 9: Your breast halves should all be finished browning at this point, and be mostly cooked (a teeny bit of pink in the center is fine). Arrange them in a row on a foil-lined baking sheet and spread a large dollop of the artichoke mixture on top. Don't let any go to waste, just pile it all on.


    Step 10: Pop them in the oven and let them bake for 7-10 minutes, or until the artichoke mixture on top is melted and starting to achieve a beautiful golden brown color. 
     

    Ohmigawd. Would you look at that? 
     

    Step 11: Open mouth. Insert fork. Game over. 


    To make a complete meal, serve with some steamed veggies and smashed salt&vinegar potatoes (recipe coming soon!) or rice. It doesn't get much better than that!

    Hope you enjoy this recipe as much as I do. Thanks for reading!
    xoxo

    JEN